How to make an apple grater yourself: drawings, instructions, video
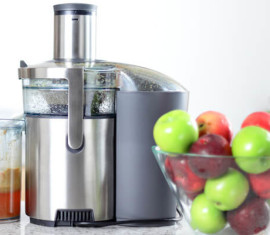
A bountiful harvest of apples and other fruits, even vegetables, can easily be preserved for the winter, or, if abundant, shredded for livestock feed using a homemade grater. Costs are low, and there are a choice of manual and electric models. Compared to a conventional grater, this device significantly saves time and effort.
Content
How to make an apple grater
 The simplest models can be assembled even without drawings. You'll need a 30 x 50 cm stainless steel sheet, a connecting plate, a control lever, and a tabletop to position and secure the structure.
First, cut a hole in the lid to the desired diameter, then use a plate to join the stainless steel sheet. All that's left is to attach the rotating lever and secure the hand grater to the countertop. It's ready to use right away.
List of required materials
A simplified version of the grater is made from the following elements:
- galvanized bucket;
- stiffening ribs in the form of steel rods;
- rebar cut;
- a box made of wood or metal;
- bedside tables (tables).
The construction principle is simple: cut off the handle and bottom of a bucket, then drill sharp edges into the sides (like a grater). Cover the structure with stiffening ribs. Thread rebar through the holes in the bucket, bend it, and form a lever to rotate the homemade grater drum. Place a crate on top to receive the apples and secure it with screws. For convenience, place the structure on a table or nightstand. Gravity will draw the fruit toward the grater, which is rotated manually.
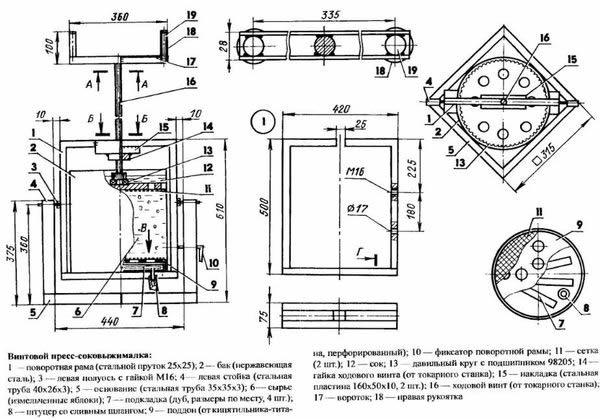
Step-by-step instructions with drawings
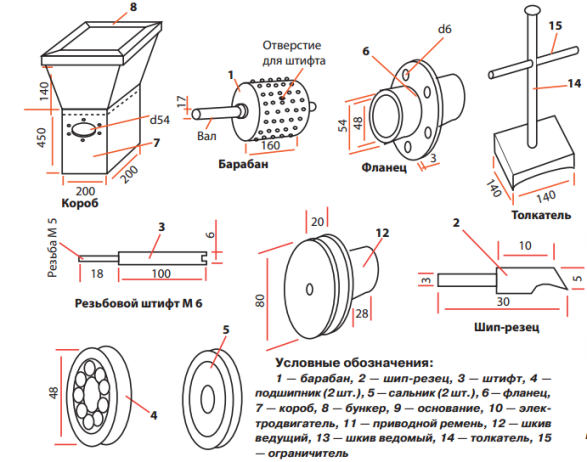
Drawings are required for more complex electric motor-based designs. A simple float is assembled step-by-step from galvanized sheet metal, ¾-inch pipe, 25 x 25 mm angle iron, and a shaft with bearings. An example drawing for assembling a mechanical design:
Assembly instructions for an efficient mechanical grater:
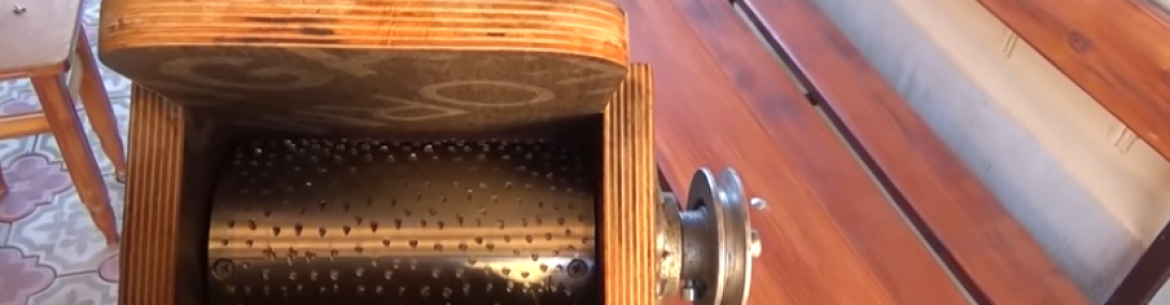
- Manufacturing the grater drum. A galvanized sheet in the shape of an elongated rectangle measuring 200 x 600 mm is marked for perforation.
- The sheet is drilled in a checkerboard pattern using a drill with a diameter of 6 to 12 mm (depending on the required size of the raw material obtained).
- Teeth are formed on the resulting holes. A steel rod of the same diameter is inserted into each hole and driven through the hole with a hammer.
- After sharpening the teeth, the galvanized steel is bent into a cylinder shape and the ends are riveted.
- To increase the drum's rigidity, reinforcement or wire rings are welded to the edges. Steel strips are welded through the centers of the rings.
- An angle and a pipe are used to weld the frame for the drum. The height is chosen so that the machine's lever can be comfortably rotated while seated.
- Holes are drilled in the center of the strips on the drum, and a shaft is welded into them. On one side, the shaft becomes support for the handle.
- Bearings are installed on both sides of the shaft and screwed to the frame.
- A galvanized funnel is mounted on top of the structure.
The resulting design is used for crushing apples, zucchini, pumpkin, carrots, and pears. A container is installed under the bottom of the drum, where the processed, juicy pulp falls.
DIY Apple Grater: Video
DIY Electric Apple Grater
A grater-style shredder can be assembled from scrap parts in a garage or shed. The design is easily adapted to your needs. It's used not only for processing apples but also for other fruits and vegetables. Upgrading and replacing the cutting element allows you to adjust the operating mode and use the unit for chopping straw, succulent, and dry feed.
The base of the shredder should be a metal bucket. Plastic options are not suitable due to their fragility and risk of injury.
The device can be assembled within a day if the appropriate components, skills, and tools are available.
What you will need
The homemade design is made from a standard set of parts:
- Hopper (apple receiving tray). Located above the working chamber, sometimes on the side.
- The working chamber contains a chopper in the form of a drum with holes and knives.
- The motor is from old household appliances such as a juicer and a washing machine.
- A tray for the finished mixture (outlet). Installed under the working chamber.
To simplify the design, apples (pears, zucchini, etc.) are placed directly into the working chamber, and then the crushed mixture is unloaded from it.
Step-by-step instructions with drawings
One of the options for a homemade grater with an electric drive is made according to the following scheme:
- The washing machine motor is attached to the edge of the bench with a tin strip and screws.
- From a sheet of stainless steel (a mandatory requirement for working with food products), two trapezoid-shaped blanks are cut out.
- The edges of the resulting trapezoids are processed with a file.
- A hole is drilled in one trapezoid, 15 cm from the top. The diameter of the hole is slightly larger than the diameter of the motor shaft. The trapezoid is secured to the motor with nuts so that the top is at the bottom.
- A cylinder is cut from a 10 x 10 cm block. A homemade stainless steel grater is attached to it with screws.
- The resulting drum with sharp holes is secured to the motor shaft. To do this, a hole is drilled along the cylinder, treated with epoxy adhesive, and then threaded onto the shaft.
- Using 10 cm wide slats, the second trapezoid is secured with self-tapping screws.
- The engine is equipped with a start button. To do this, a starting relay is connected to the motor wiring, and then a regular switch (wire with a plug) is connected to it.
Assembly drawing of the electric-driven grater:
Video
The videos available online demonstrate the methods for making a garden apple grater described in this article in detail. All models, from simple to powerful and multifunctional, require varying amounts of time and budget.
In addition to the equipment options listed, the motor can be taken from a vacuum cleaner, hammer drill, drill, electric saw, pump, walk-behind tractor, etc.
Using an electric grater
A grater with a manual or electric motor will make gardening easier and provide an opportunity for additional income. Parts for making one can be found in a shed or garage. If you have pets, a shredder will help you prepare feed for future use and chop up unhealthy vegetables from your own garden or those purchased from neighbors.
Making an apple grater is within the reach of most homeowners. Barrels, oil jars, washing machine bodies, and homemade prefabricated units can be used as containers. Tools required include a drill, an angle grinder, metalworking tools, and welding. Comparing the cost of store-bought units with the cost of assembling one yourself, it's easy to see the advantage of the latter. A properly and carefully assembled unit will last a long time, and its repairs are inexpensive.