Grafting an apple tree with a drill: step-by-step instructions and tips for improving results
Once sap flow in the tree tissues is activated, the most favorable time for grafting begins. One of the most unusual and simple methods is grafting with a drill onto the trunk of a mature tree. This not only helps rejuvenate an old tree but also adds missing shoots.
Tools
It's best to use a drill to graft plants of the same species. For example, graft apple trees onto apple trees, grapes onto grapes, pears onto pear trees, and so on.
First, you need to prepare the necessary tools so you have everything at hand. You'll need:
- drill;
- twist drill;
- sharp and disinfected pruning shears for garden plants;
- a sharp garden knife treated with an antiseptic;
- any garden var.
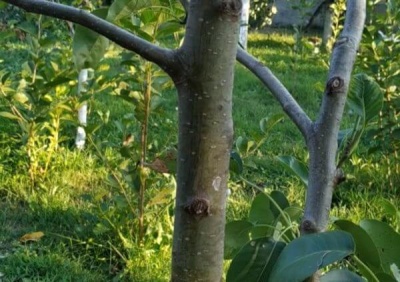
The mother tree must have a trunk of sufficient size (at least 1.5 meters). It must also be free of any defects, cracks, damage, growths, or signs of disease.
Step-by-step vaccination
To avoid making mistakes when grafting with a drill, follow the following step-by-step instructions.
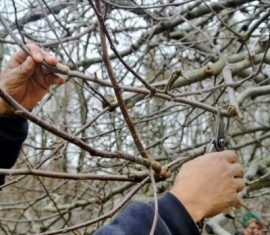
Step 1. Using sharp garden pruning shears, cut a small shoot from the plant you are grafting (scion)cutting). The diameter of such a handle should be equal to the diameter of the drill bit.
The cut shoot should have at least 4 buds.
Step 2. On the tree onto which you will graft the cutting (onto the rootstock), choose a place without any shoots or branches.
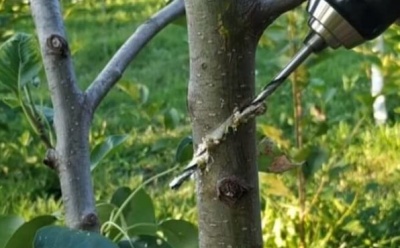
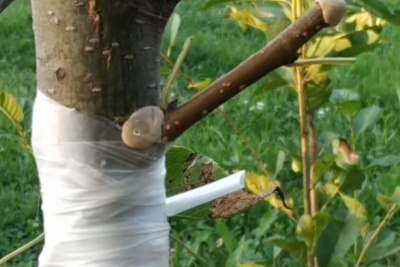
Step 3. Using a drill and the chosen bit, make a hole in the trunk. The hole should be positioned at an angle that matches the angle of the plant's skeletal branches. The hole should be approximately 10–15 cm deep.
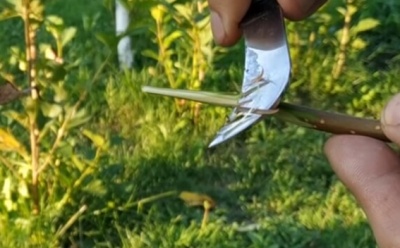
Step 4. Using a pruning knife, make several cuts in the bark of the scion. The cuts should be circular. This will allow the bark to be removed quickly and without causing any unnecessary damage. The height of the cut should be equal to the depth of the hole in the rootstock.
The cut should be made at the thick end of the scion.
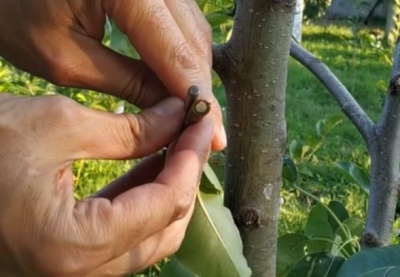
Step 5. Take measurements. The cutting should fit perfectly into the hole in the trunk. If the height cut If the scion is deeper than the hole in the rootstock, you'll need to shorten the scion slightly using the same knife or pruning shears. If you do everything correctly, the bark will be the hole and cut on the scion they will coincide along the entire circumference of the hole.
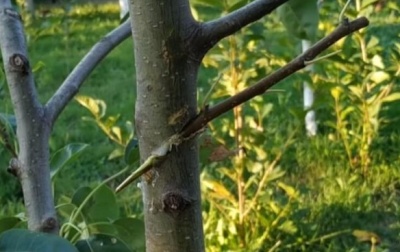
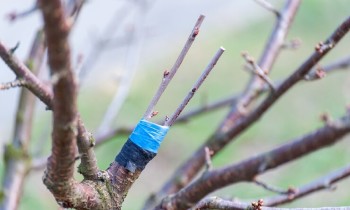
Step 6. Lubricate the joint between the scion and rootstock garden pitchThis protects plants from the proliferation of pathogenic microflora and the appearance of insect pests.
To ensure that the grafting is successful, it is best to graft several cuttings onto the trunk of one tree at once.
If you carry out the work in early spring, you'll notice the positive results of this grafting within about a week. You'll see the fruiting buds on the scion swell and bloom.
Adviсe
Both novice and experienced gardeners can benefit from these helpful tips, which, if followed, will increase the chances of the scion taking root properly:
- The bark at the grafting site should be free of cracks, growths, or defects. It also should not peel away from the tree trunk.
- Once the scion has developed leaves, avoid pruning the shoot above the graft. Wait a while; pruning too early can harm the plant. Leave the tree until next year; it's better to cut the branch in the new season.
- It's not always possible to graft a shoot with a drill on the first try. This also requires some skill and experience. So don't be discouraged if you don't succeed right away. Try grafting several cuttings onto one tree at once; this will increase your chances of success. Or wait until next year and repeat the process; you'll definitely succeed the second time!
- Some more experienced gardeners place the cleaned cutting in their mouth for a few seconds before inserting it into the hole. Human saliva has been proven to significantly accelerate plant survival, as it contains auxin (a stimulant).
- The best time for grafting with a drill will be the same period as for the method “into the cleft"The mother plant should already be sap-flowing, but the buds on the grafted cuttings should be dormant. Planting too early will cause the mother plant to reject the scion.
Pros and cons
Like any grafting method, drill grafting has its advantages and disadvantages. According to gardeners who have used this technique repeatedly, the scion takes root in approximately 80% of cases.
It is best to use drill grafting to restore stumps or rejuvenate old trees that have lost large branches.
Drill grafting is most effective in small garden plots owned by private households. Of course, for larger areas and industrial plantings, this method is simply impractical:
- A drill bit will need to be individually selected to match the size of each scion. If there are too many trees, this selection will take a significant amount of time, and the work will not be completed on time.
- You'll have to come up with a plan for providing the area with electricity—running wires through the grass or bushes. This is a direct violation of safety regulations when working with electrical appliances.
- The amount of detailed and meticulous work required makes it impossible to achieve a consistently high-quality graft for every tree. The likelihood of errors increases significantly.
But in small areas with a limited number of plantings, the drill method works much more effectively:
- the procedure does not take much time;
- the work is carried out quickly;
- minimum damage to plants;
- minimum required tools.
Conclusion
Drill grafting is a simple and quick way to introduce a scion into a mature tree. This method is excellent for rejuvenating and restoring the health of older plants. However, its effectiveness will depend directly on the gardener's skill and adherence to recommendations.